Showing posts with label Photoshop. Show all posts

Tuesday, 23 April 2013

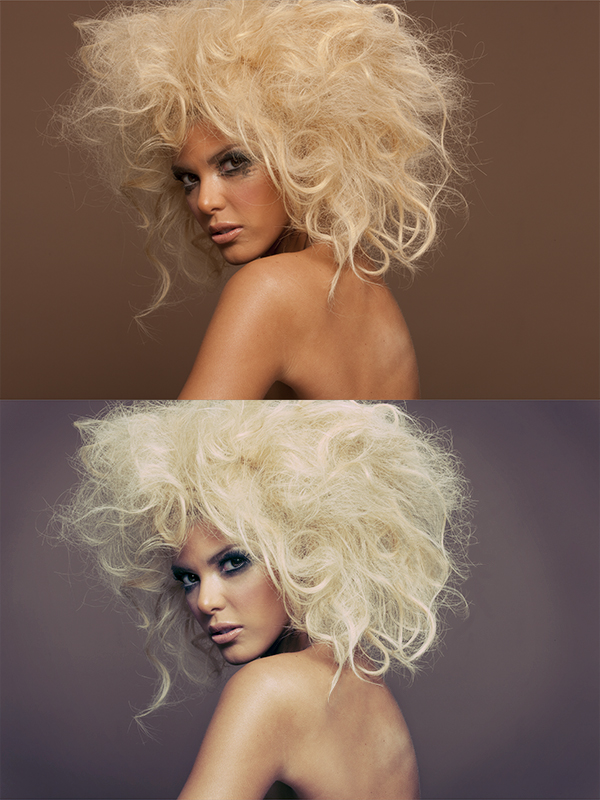
Retouching Practice


Hi everyone, guess who hasn't dropped off the side of the planet! I have a tonne of deadlines happening around this time and I would be lying if I said I wasn't stressed out of my brain, but thankfully today I found some time to do some personal work, and wasn't it lovely! Its been quite a while since I did any retouching work and since I'm considering it as a possible career path, I thought it was due time to get more practice done. I downloaded this photo from here and it was quite enjoyable to work on. I haven't done a great deal of hair retouching before so this gave me a chance to give it a proper go, I also tried painting in hair and eyelashes which I think has worked really well here. Overall, I'm really pleased with the final image! I was able to spend enough time on it to keep my mind off of deadlines but it wasn't too long that it felt tedious. I'd recommend this image if you'd like to spend 2-3hrs retouching.

Friday, 29 March 2013

Happy Easter Colour Palette


Blowing eggs for Easter makes me feel like a big kid, its so nostalgic for me since my mum used to sit my little sister and I down just before Easter with an egg each for us to blow and then decorate. Nowadays I don't use masses of paint or stickers to decorate my eggs, I use Sharpies and paint markers instead since it makes the decorating process so much quicker since there is no drying time. I really liked my handiwork this year so I decided that I wanted to show you guys, but when I saw the photograph I didn't "see" the eggs, what caught my eye was the subtle colour palette. And then one thing lead to another, so my Easter egg display became a Easter colour palette instead, haha. I love when little things like this happen! It feels so organic to do something with a vague idea or plan, but then become inspired to create something completely different.

Hope you all have a fabulous Easter! 

Wednesday, 27 March 2013

My Thoughts On Watermarking + a Giveaway!

I am very particular with watermarking, I tread a very fine line of loving and hating it but that of course depends on the circumstances surrounding an image. Most of the time I believe that (in my case) I am taking a photo to express myself and it is part of my art, so it can be spoilt if you overlay a huge garish watermark over the top of a once beautiful image.. seriously, sometimes it makes me so angry! But at the same time I realise that if you're trying to make a living from photography, it is vital to watermark your images as a way of self promotion. Just imagine, a couple are scouring the internet for wedding photographers when all of a sudden they see your image and know they want to work with you!..but the image is posted somewhere without any details about the photographer.. well, with a watermark of your name or business stamped somewhere on the image the couple can search the web for your website and get in contact with you! Without that watermark, you would've lost a potential client and in today's economic climate, most businesses cannot afford to do that.

I have a real hatred for large ugly watermarks so in my opinion I think the best way to watermark your images is by making it very small and faint. That way it doesn't take over the image but it is still there to promote yourself. Here's an example:


However if while at your photography business a client asks to see their proof images, this style of watermarking may not be suitable. Instead you may decide you need something repeatedly imprinted on the image to prevent clients from saving the proof images and using them for free. In this case you may need something similar to this:

[image courtesy of Visual Watermark]

It all depends on the target audience and purpose of the image! 

The main issue that I used to have with watermarking was that there was no real easy way of watermarking your images. Every image you wanted to use would have to be opened up in photoshop and then you would create the watermark on the layer above the image.. try to do this more than 10 times and you will probably lose your marbles and give up! That is unless you have a tool to do it for you such as Visual Watermark.

Visual Watermark allows you to imprint the same watermark(s) on 100s of images in just 1 minute through batch processing. It is extremely easy and versatile to use, and just unbelievably fast! I was able to watermark all my recent blog photos in quite literally a second! It has a stunning interface to work with and my favourite feature is that the software taps into your computer's fonts so if you use a custom font on your website, you can use the same font as part of your watermark. Makes keeping a consistent brand identity so much easier!

And one of you guys will be able to win a copy of Visual Watermark by entering this giveaway! To enter the giveaway you just need to login in the widget below and fill out whatever entries you like, good luck everyone!

a Rafflecopter giveaway

Friday, 22 February 2013

Freebie Friday - "Valentine Photoshop Action"


A brand new photoshop action for you all to try, just click this link and find the download button! 

Monday, 11 February 2013

Manniphotography's Hair Retouching Tutorial

Here is Manniphotography's four part hair retouching tutorial. While retouching my purchased images I realised that I actually didn't know how to retouch hair, an element that can quite easily be the focus of a photograph. To remedy this I scoured through YouTube to try and find out the best techniques and tools for the job, and I have to say this series of tutorials was amazingly insightful and I know that I will always fall back to these if I get stumped by an image. I hope you guys enjoy the tutorials and if you like Manniphotography's work you can check out his website here and his YouTube channel here.


Tuesday, 5 February 2013

Photo Retouching Portfolio

After doing a bit of research on what a photo retouching career entails and what it is generally like, I have come to the conclusion that I would love to get into that field of work. Like all creative careers, before you can get anywhere up that tricky job ladder, you need to show your potential clients/employers what you can do with the help of a portfolio. I bought three different photos from editablephotos.com for about 80p each, so I could work on large RAW files from professional model shoots and I'm now smitten with this website! I sometimes spend an entire afternoon just browsing through all of the amazing photos in their growing library and think about what I can add to each image to make it the best it can possibly be. These are my three before and after images of the photos I've been working on, any constructive criticism would be amazing!


Sunday, 4 November 2012

Project 'Making Strange" - Digital Experimentation


I've been finding it really difficult trying to use film to capture the images that I've imagined, to help myself with this I have been experimenting with some poses, lighting and camera settings with my DSLR.

Here, I am playing with the idea of myself not recognising my own identity by masking out my face with scribbles. To accomplish this affect in the darkroom I will place a piece of clear acetate over my photo paper and then use a black marker pen to scribble out my face before exposing the paper to the light. This should then leave a white scribble obscuring my face.

For the set-up, I hung up the black side of my reflector to create a make-shift backdrop and then had the light pass through a nearby window. For my next shoot, I will continue to use my reflector as a backdrop because I cannot afford a black backdrop just yet, and I will incorporate my studio lights into the set rather than relying on the changing lighting conditions through the window.

I am happy with these shots and feel like they are a step in the right direction. 

Next, I would like to incorporate a white mask into the photos rather than scribbles and I will begin researching "Darkroom sandwiching" and how to create photo books. 


Monday, 1 October 2012

Postcards from the Edge Pt 2


This is my second go at my concept for my 'Postcards from the Edge' project, this time, featuring my sister instead of myself.

Do let me know what you think of them!

Saturday, 29 September 2012

Postcards from the Edge


So we've started our first project now and even though it is just a short practice project, I am so excited to actually get some photography done! Its entitled "Postcards from the Edge" and it asks the students to "explore the city of Plymouth and produce a small body of work that conveys your impressions and perceptions of the city" and then select two final images to be made into postcards to send to family and friends!

The concept behind my idea is based on the fact that I was born in Plymouth and have practically lived there all my life, so I already know the city pretty well. With this in mind, I decided to focus on the more rural areas of Plymouth rather than the urban areas. I also decided to frame these photos in my own silhouette self-portraits as I am primarily a portrait photographer and silhouette portraits were very popular as postcards in the 1900s!

Tuesday, 14 August 2012

Classique Action Freebie


Here's my latest action for you guys to use, It works extra well with portraits as it really compliments the skin tone and brings out the eyes. It was inspired by my last inspiration post here, so I used shades of nude to create a soft sepia effect to add a bit of colour to a classic black & white photo. I hope you like it!


To use, just download from here and install into your Photoshop. I use photoshop CS4, so it should definitely work on other CS(s) but I'm not sure on the other ones like Elements.

Use however you like, I don't mind.

Wednesday, 8 August 2012

Neapolitan Haze Action Freebie


Here is my first photoshop action for you guys to use if you wish. Its very simple and nothing special, but it is an effect I use often so it may be somewhat useful to you.

To use, just click this link here then download and install into your Photoshop. I use photoshop CS4, so it should definitely work on other CS(s) but I'm not sure on the other ones like Elements.

Use however you like, I don't mind.
Blogging tips